These days the organization and the structuring of the code can be a nightmere for the developers. Еach day the size and the complexity of the projectst increases. The requirements are more and more. At the end the developers begin to weave in unpalatable for them spaghetti without dressing. This condition is called "spagetti code". With the growth of the project and its complexity the navigation in the code bekome more difficult. The same parts of the code are dublicated at several positions. It is not clear at first look which part of the code must be corrected by any feture task or bug fix. The code is a nightmere for the newcomers developers and they need more time to get into the workflow.
All this can be avoided with some structiral and naming convention of the files and their folders and easily attainable organization of the code. The convenient naming of files and folders helps the developer to find faster the desire part of the code and the organization of the code in different files facilitate the big files with a lot of code.
In this post I will show you how to organize your code, controllers and views for better further maintenance and development. For the purposes of the post I use PHP with a clean installation of Laravel and PhpStorm IDE.
Laravel and MVC
Let's get a overview how Laravel applications work. You may know already that the standard Laravel 5 application structure has three directories for Models ( /app ), Controllers ( /app/Http/Controller ) and Views ( /resources/views ). Laravel follows the model-view-controller (MVC) architectural pattern, which enforces a separation between “business logic” from the input and presentation logic associated with a graphical user interface (GUI).
There are three components to the MVC pattern:
- A controller can send commands to the model to update the model's state. It can also send commands to its associated view to change the view's presentation of the model.
- A model stores data that is retrieved according to commands from the controller and displayed in the view.
- A view generates an output presentation to the user based on changes in the model.
A typical Laravel application consists of the above mentioned MVC components, as you can see below:
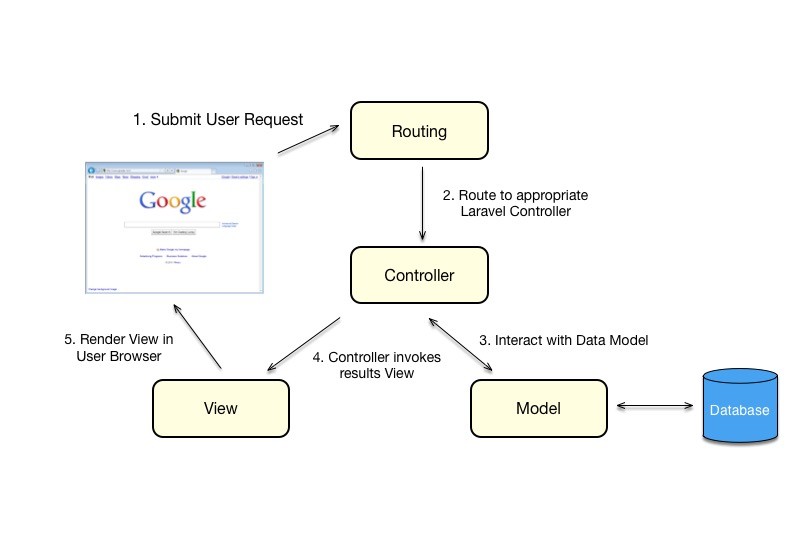
Laravel promotes the concept that models, views, and controllers should be kept quite separate by storing the code for each of these elements as separate files in separate directories. This is where the Laravel directory structure comes into play. The Views and Models are relatively tiny and typically contains only few lines of code. The most code is located in the controller that process the user input, interact with Data Model and invokes the View. With the growth of the project growth the Controllers and begin to shape the so-called "spagetti". The developer must scroll up and down, the repeating logic must be outputted in separate function and so on.
Organize your Controller using Helpers and Repositories
That's why I always suggest to set apart the "business logic" (controller logic) and interaction with Data Model in separate files and folder and use them in Controller. I call them Helpers and Repositories. The Helper is an Trait that process the controller logic or repeating logic of given Controller. The Repository follow the Repository pattern, separates the data access logic and maps it to the Controller.
Some of the benefits of this separation are:
- Centralization of the business and data access logic makes code easier to maintain
- Business and data access logic can be tested separately
- Reduces duplication of code
- A lower chance for making programming errors
- Every portion of code has it's own specific position and can be quickly found from the developer
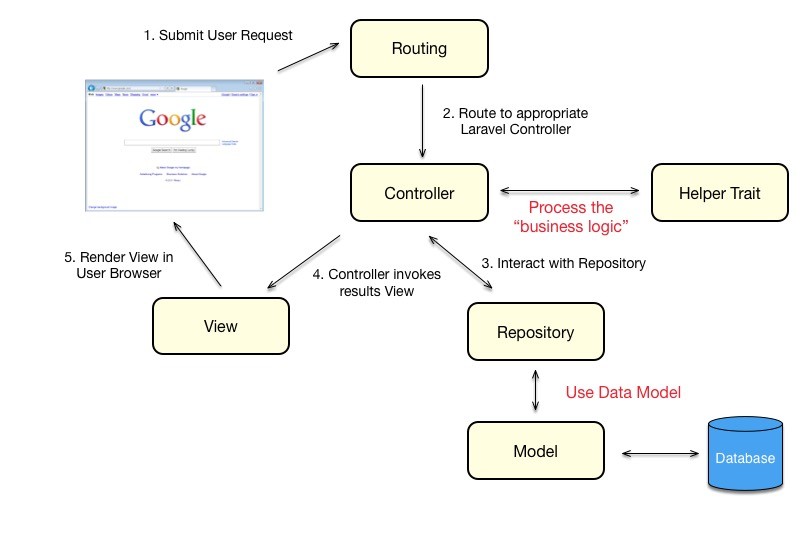
The fоllowing diagram show how to optimize the Controller so that the controller logic and interaction with Data Model to be set apart :
Organize your files and code using Functional Naming Convention
Let's take some controller named "Blogs". To find the desired file (code) faster and for better organization I always use the following naming convention:
- Controller -> BlogsController
- Helper -> BlogsHelper
- Repository -> BlogsRepository
- RepositoryInterface -> BlogsRepositoryInterface
So when I seach for file related to Blogs (⇧⌘O) in PhpStorm. I just need to write "Blogs" and it show me all files related to BlogsController.

Helper
Helper processing the controller logic in separate Trait that is used in the controller. This will help you to separate the "business logic" from the Controller. In this way you have an easy to read straightforward Controller that can be later easily maintenanced and further developed.
class BlogsController extends Controller
{
 use BlogsHelper;
Use "helper" prefix for all Helper methods, this will help you later to read the code and to orient you easily in it.
$posts = $this->helperGetBlogData();
Repository
Repository separate the data access logic from the Controller. A Repository is simply an Interface between the Data Model and the Controller. You can think of them as a contract that states that certain methods will be made available when using this interface. Read "How to use Repository pattern in Laravel 5" to learn how to use Repositories in Laravel.
Service Provider named RepositoriesServiceProvider bind the BlogsRepositoryInterface to BlogsRepository.
use Illuminate\Support\ServiceProvider;

class RepositoriesServiceProvider extends ServiceProvider
{
    public function register()
    {
        $this->app->bind( 'App\Contracts\BlogsRepositoryInterface', 'App\Repositories\BlogsRepository' );
    }
}
Implementing the BlogsRepository in the BlogsController.
class BlogsController extends Controller
{
 use BlogsHelper;

 /**
 * @var BlogsRepositoryInterface
 */
 private $repoBlogs;

 public function __construct(BlogsRepositoryInterface $repoBlogs)
 {

 $this->repoBlogs = $repoBlogs;
 }
Use "repo" prefix for all Repository instances. This and the PhpStorm autocomplition will help you to find faster the desited Repository. Just write $this->repo and you will see a list will all injected Repositories in current Controller.

Controller, Helper and Repository working together
Controller interact with the Repository through his instance injected in the constructor and can call directly all methods of the Helper Trait. Let's see for example the following code which is located in the Controller. The function (action) "single" call at line 3 the Repository and after that call at line 6 the Helper to process the Data Model returnet from the Repository. The Repository is called through it's injected instance in the Controller. The Helper is invoked directly with $this refer to the current Object (Controller).
public function single($ulink)
{
    $post = $this->repoBlogs->findByUlink($ulink,true);
    if(!is_object($post)) abort(404);

    $firstImg = $this->helperFirstImgData($post);

    $backUrl = action("BlogsController@index");

    $previous = $this->repoBlogs->previousPost($post->id);
    $next = $this->repoBlogs->nextPost($post->id);

    return view("blogs.blogs_single",compact("post","category","firstImg","backUrl","previous","next"));
}
Because the Helper is an Trait and the Repository is instantiated (injected) in the Controller. The Helper has direct access to the Repository just like the Controller. This will allows your to interact with the Data Model through the Repository directly from the Helper. Let's see for example the following code which is located in the Helper. At line 3 the Repository is called direclty from the Helper. At line 8 is invoked another method of the Helper.
private function helperGetBlogData()
{
    $postModels = $this->repoBlogs->blogsByCreatedAt();

    $posts = false;
    foreach ( $postModels as $postModel )
    {
        $posts[] = $this->helperPreviewBlogDataForBlog($postModel);
    }

    return $posts;
}
Organize your Controllers
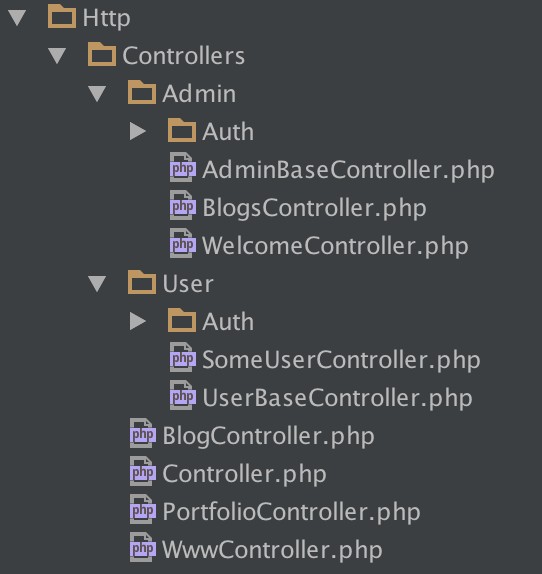
Imagine that you need to develope an application with back-end and front-end user interface and the front-end is divided into two areas. Area with free www access and area for the authenticated users. You will need to separate in some way your controllers. Best way to do that is to locate the all back-end controllers in separated folder named "admin" (or whatever you want) inside the .../Http/Controllers folder and accordingly the all front-end controllers in "user" folder and leave the free www controllers in the root .../Http/Controllers folder. Now you know that all admin controllers are located inside the .../Http/Controllers/admin folder and all user controllers are located inside the.../Http/Controllers/user folder and they have it's own namesapce. At the end you will have the following folder hierarchy:
As next step you must register your controllers in routes.php. Best way to do this is to create two route groups. One gourp for the fron-end (user) controllers that need some kind of user authentcation. And one group for the back-end (admin) controllers that are accessible only from the administrators. Read here more about Route Groups in Laravel. You can register of course your free accessible www controllers as standard Laravel controllers without any kind of user authentication (middleware).
######## ADMIN ########
Route::group( [
    'prefix'     => 'admin',
    "namespace"  => "Admin",
    "middleware" => "auth.admin"
], function ()
{
    Route::controllers( [
        'some-admin-route' => 'SomeAdminController'
    ] );
} );

######## USER ########
Route::group( [
 "namespace"  => "User",
 "middleware" => "auth.user"
], function ()
{
 Route::controllers( [
 'some-user-route' => 'SomeUserController'
 ] );
} );

######## WWW ##########
Route::controllers( [
 'some-www-route' => 'SomeWwwController'
] );
Best practices: It is a good idea to have an AdminBaseController and UserBaseController as root Controller for all admin and user controllers that extends the default application Controller. The base Controller could be used as global container for global helpers, functions and variables. Imagine you need a global Helper (trait) which must be accessible to all admin controllers. You just need to use the GlobalHelper in your AdminBaseController and its methods will be accessible in all admin controllers that extends the AdminBaseControlle. Another good idea is to implement the base Controller as abstract class. This will make your admin controllers more flexible.
 //application controller
 use App\Http\Controllers\Controller;

 abstract class AdminBaseController extends Controller
 {
 use AdminGlobalHelper;

 protected $ADMIN_GLOBAL_VARIABLE = ["some","global","staffs"];

 protected function adminGlobalFunction(){}
 }
class SomeAdminControler extends AdminBaseController{}
class AnotherAdminControler extends AdminBaseController{}
Organize your Views using Controllers Naming Convention
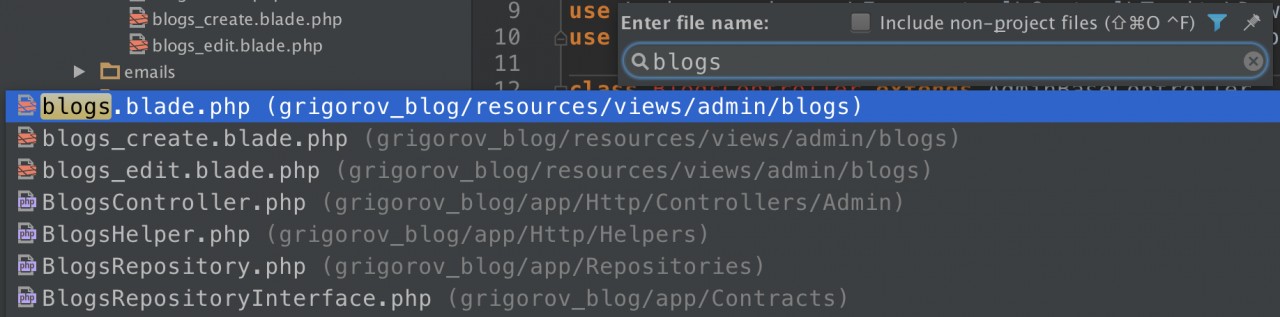
With the growth of the project rise the number of the views. If all views are located in single or several folders then you can easily confuse yourself. To find the correct part of code or view can cost you a lot of time that can be consumed for something meaningful. For example if you not using the Controller Naming Convention and you need to find the view of the following url "http://grigorov.website/admin/blogs/create" you may go through following 5 steps:
- Look at the routes.php for the coresponding Controller and Method.
- Open the coresponding Controller.
- Find the coresponding Method.
- See the path to the view.
- Go to file explorer and navigate to the view.
Have you asked yourself how to find some view directly from its url without the need of going through the 5 steps above? This can be realy easy if you following the Controller Naming Convention. You just need to distribute the views in folders named as the controllers in which they are used. The name of the view must have as name the name of the corresponding Controller (as prefix) and Action (as suffix) devided with underline ("_"). For example if you have an action BlogsController::getCreate, you schould have an view named "blogs_create.blade.php" inside the .../views/admin/blogs folder.
Best practices: You can leave the name of the view of the index action without "index" suffix because it is assumed by default.
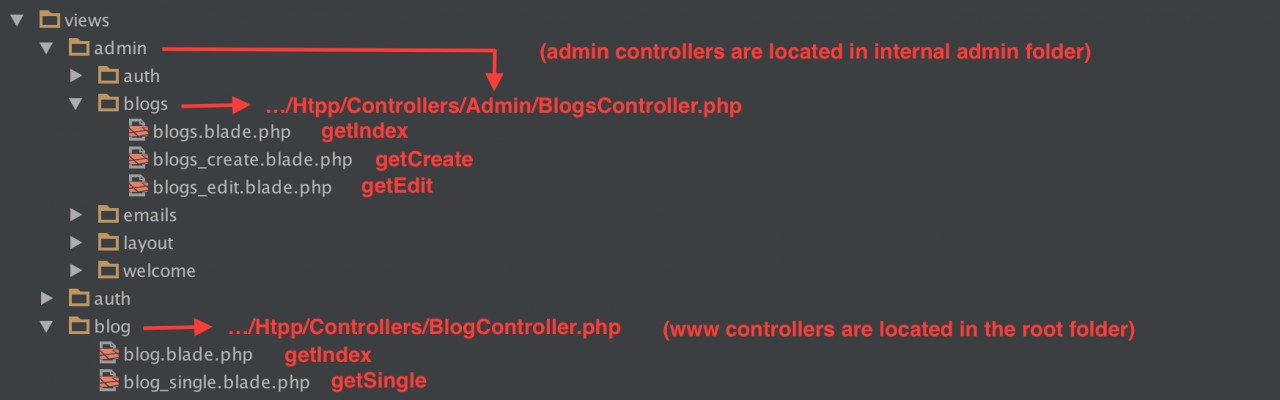
Now when you need to change the post creation view with url "http://grigorov.website/admin/blogs/create". You just need to search for file "blogs" or more specific for "blogs_create" in PhpStorm (⇧⌘O).
Conclusion
A well structured project can save you a lot of time and headaches so it is aways a good decision to organize your project in some way. In this post I write about the organization and the sturcture of my projects. Mayby you find some of my advices helpfull and others not so, it's your choise to organize your projects in that way or in your own way. Just think ahead before start coding.
One advice for last: Follow your structure and project organization in all your projects. In that way it will be easy to you to maintenance a lot of projects because they will have similar structure.